How to deploy Nuxt SSR to DigitalOcean using Docker compose and Nginx
Those who are familiar with nuxtjs ecosystem, we can say that nuxtjs is a powerful tool for building server side rendered applications. And we can esaily make our own server side rendered applications with the help of nuxtjs.
But when it's comes to deploying our nuxtjs application to any vps, we need to know how to deploy it. In this tutorial we are going to learn how you can deploy your Nuxtjs server side renderd application to any vps with the help of docker, docker-compose and Nginx.
For this seek of tutorial, we are going to use a docker-compose file to deploy our nuxtjs application and we are going to deploy our application to DigitalOcean.
To deploy our nuxtjs application to DigitalOcean, we need to follow the steps below.
- Step 1: Create a new Nuxtjs project.
- Step 2: Create a docker-compose file.
- Step 3: Create a nginx configuration file.
- Step 4: Deploy your nuxtjs application to DigitalOcean.
So without further ado, let's start with the first step.
Step 1: Create a new Nuxtjs project.
In case you know how to create a new nuxtjs project, you can skip this step. Otherwise you can follow the steps below. To create a new nuxtjs project, you can use the following command.
$ nuxt new my-nuxt-projectOnce you have created a new nuxtjs project, you can navigate to the directory of the project. In our case, we have created a new project named my-nuxt-project. So we are going to navigate to the directory of the project. and then we are going to run the following command to run the nuxtjs server.
    $ cd my-nuxt-project
    $ npm run dev
In case you're using
yarninstead ofnpm, you can use the following command to run the nuxtjs server.
$ yarn devAs you can see that our nuxt js server is running. Make sure when you're creating the new nuxtjs project, choose the SSR option when you're asked to choose the nuxtjs build type.
Step 2: Create a docker-compose file.
Now we're supposed to create a docker-compose file. But before we do that, we need to create a docker file first.
Create Dockerfile for the nuxtjs application.
So to create a docker file, just navatige to your project directory and on the root directory of the project, create a file called Dockerfile.
And now pase the following code to inside the docker file.
FROM node:12.16.3-alpine3.9

RUN mkdir -p /var/www/dockerize-nuxt/nuxt-app
WORKDIR /var/www/dockerize-nuxt/nuxt-app

COPY package*.json ./
RUN npm install

COPY . .

RUN npm run build

EXPOSE 4000

ENV NUXT_HOST=0.0.0.0

ENV NUXT_PORT=4000

CMD [ "npm", "start" ]
In the docker file, first of all we are going to use the FROM command to specify the base image of our docker image. In our case, we are going to use the node:12.16.3-alpine3.9 image. Then we are going to run the mkdir -p /var/www/dockerize-nuxt/nuxt-app command to create a directory named nuxt-app inside the docker image. And then we are going to run the WORKDIR /var/www/dockerize-nuxt/nuxt-app command to change the working directory to nuxt-app.
After creating the directory inside the docker image, we are going to copy the package.json file to the docker image. And then we are going to run the npm install command to install the dependencies of the project.
Once we are done with the npm install command, we are going to copy the . directory to the docker image. And then we are going to run the npm run build command to build the nuxtjs application.
Now all of our nuxt app code is copied over to the docker image. And we are going to expose the port 4000 to the internet. And we are going to set the environment variable NUXT_HOST to 0.0.0.0 ( It's a wildcard address ). And we are going to set the environment variable NUXT_PORT to 4000.
It's time to tell the docker image to run the nuxtjs application. So we are going to use the CMD command to tell the docker image to run the nuxtjs application.
Remeber we have defined some environment variables in the docker file. So we need configure
nuxt.config.jsfile to use those environment variables.
Here are those changes to need to be made in the nuxt.config.js file.
module.exports = {
  server: {
    host: process.env.NUXT_HOST,
    port: process.env.NUXT_PORT,
  },
};
Create docker-compose file.
After you done with the avobe steps, you can create a docker-compose file. On the root directory of the project, create a file called docker-compose.yml.
Now pase the folowing code to the docker-compose file. Then we are going to discuss what we are doing inside the docker-compose file.
version: '3.7'

services:
  app:
    build: .
    container_name: nuxt-app
    restart: always
    ports:
      - '4000:4000'
    command: 'npm run start'
In the docker-compose file, we are going to use the version command to specify the version of the docker-compose file. And then we are going to use the services command to specify the services that we are going to use.
For this tutorial, we are going to use one service called app. So we are going to use the build command to specify the directory that we are going to build the nuxtjs application. And then we are going to use the container_name command to specify the name of the docker container that we are going to use. And then we are going to use the restart command to specify that we are going to restart the docker container whenever the docker image is updated. And then we are going to use the ports command to specify the ports that we are going to expose to the internet. And then we are going to use the command command to specify the command that we are going to run inside the docker container.
In our case it's going to be npm run start.
Now we're done with the docker-compose file. Now we're going to next step to deploy our nuxtjs application to DigitalOcean.
Step 3: Create a nginx configuration file.
To create a ngnix configuration file, we are going to create a folder in the root directory of the project called nginx. And then we are going to create a file called nginx.conf inside the nginx folder.
Pase the following code to the nginx.conf file.
upstream nuxt_app {
    server app:4000;
}

server {
    listen 80;

    client_max_body_size 100m;

    location / {
        proxy_pass http://nuxt_app;
        proxy_set_header X-Forwarded-For $proxy_add_x_forwarded_for;
        proxy_set_header Host $http_host;
        proxy_redirect off;
    }

}
Now create a Dockerfile file inside the nginx folder and pase the following code to the Dockerfile file.
FROM nginx:1.19.0-alpine

RUN rm -rf /etc/nginx/conf.d/default.conf

COPY nginx.conf /etc/nginx/conf.d
We are using alpine version for all docker images to make our project size smaller.
Once you're done with Dockerfile and nginx.conf files, now let move back to the docker-compose.yml file again and make some more configuration changes.
Configure the docker-compose file.
Pase the final code to the docker-compose.yml file.
version: '3.7'

services:
  app:
    build: .
    container_name: nuxt-app
    restart: always
    ports:
      - '4000:4000'
    command: 'npm run start'

  nginx:
    build: ./nginx
    ports:
      - '80:80'
    depends_on:
      - app
With this final code, we are done with the docker-compose file. Now we're going to push the code to github [You can use gitlab or other service provider], then deploy our nuxtjs application to DigitalOcean.
Step 4: Deploy nuxtjs application to DigitalOceanDeploy nuxtjs application to DigitalOcean.
To deploy our nuxtjs application to DigitalOcean, you need to have an account with DigitalOcean. If you don't have an account with DigitalOcean, You can sign up for free at DigitalOcean.
Create droplet.
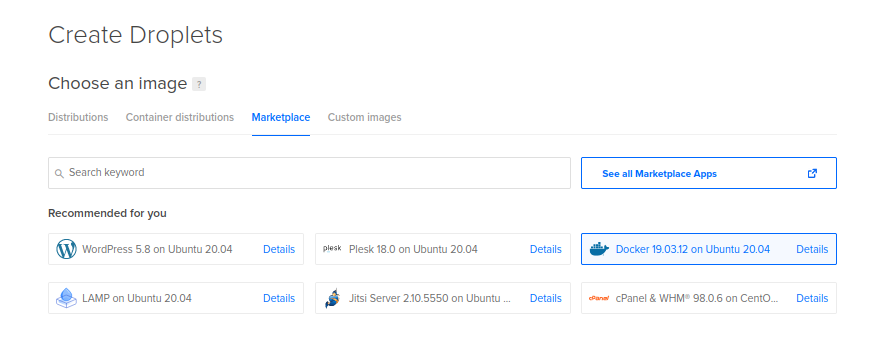
Once you logged in to your DigitalOcean account, you can create a droplet. You can create a droplet by clicking on the Create Droplet button.
Select marketplace and choose Docker 19.03.12 on Ubuntu 20.2 and then selcet the plan, region and size based on your project requirements.
Now it's time to choose wheather you want to use SSH or Password to access the droplet. In my case, I am using SSH.
If you want to use SSH, you need to create an SSH key. If you don't have an SSH key, you can create one by clicking on the Create SSH Key button. Then you can copy the public key and paste it to the Authorized Keys section of the ~/.ssh/config file. For more details, please refer to the SSH Guide.
Once you done with all the steps above, you can create a droplet. Just click on the Create Droplet button. It will take a few minutes to create the droplet.
After the droplet is created, you can access the droplet by clicking on the View button. You can also access the droplet by clicking on the IPv4 address. You can also access the droplet by clicking on the IPv6 address.
Final steps to deploy nuxtjs application to DigitalOcean.
Head over to your terminal and run the following command to deploy your nuxtjs application to DigitalOcean. Let's ssh into the droplet. In my case I am using Ubuntu 20.04 OS, in case if you are using windows you can use putty. To download putty click here.
Pasete the following commands to the terminal to loging to your vertual machine.
ssh root@<IP address>
IP addressis the Public IP address of the droplet.
Select yes to accept the ssh key. In our case we have already choosen Docker template to create the dropelot. So we don't need to install docker in our droplet. So now create a directory called myapp or whatever you want to call it. and the cd into the project directory.
Pull the latest code from github.
Pasete the following commands to the terminal to pull the latest code from github.
git clone <your github repo url>After you done with cloning the code, you can start the nuxtjs application by running the following command.
cd myapp
docker compose up -d --build
:tada: Congratulations! You have successfully deployed your nuxtjs application to DigitalOcean.
Now it's time to have a cup of coffee and watch our application runnning on the DigitalOcean.
Head over to your browser and open the Public ID address to see the application running on DigitalOcean.
Conclusion
If you found this article helpful, please upvote it. Thank you. Or else if you have any questions, please comment below. I will try to answer as soon as possible. And if you have any suggestions, please share it with me. Thank you.