Making REST API with Djago REST Framework and Vue.JS | Blog Part 3
In this part three, We are going to advancing our Django blog by making CRUD ( create, read, update, delete ) API and making our blog SPA using Vue.JS . So, we are going to learn Django REST Framework Basics and Vue.js to create a REST API for the existing project Blog in Django.
So, if you are not go through the previous tutorials about “How to make a Basic Blog in Django”. Then follow these links to read them.
- How to create a Basic Blog in Django | Part One
-
How to add authentication or registration system in Django Blog part 2
Before we get dipper into the post, we need to know about little bit of Vue.JS first because that’s another framework we are going to use in our blog application.
What is Vue.JS?
In order to describe in simple way, Vue.JS is a framework which based on JavaScript to create the fronted easily as SPA (Single Page Application) of our web application. Now it might be comes into your mind that why do we need to use Vue.JS instead of using simple HTML, CSS and Django Templating Syntax? So, for this kind of quires you should visit the Vue.JS official website to know more.
Here is the link of Vue.JS offical website. 👉 https://vuejs.org/
Creating the first REST API for our blog
If you already know what is Vue.JS that’s a plus point for you. So now let start coding to get this done.
Requirements
- Python 3.6 or above
- Django
- Git
- Node.Js
- Vue.js
1.Creating the project environment
To create the project environment open the existing project in your favorite code editor ( mine is Sublime Text 3 ) and activate the virtual environment in the project directory. In case if you don’t know which project directory we are taking about then you can clone the repo from our Github.
Before we elaborate this step, we also need to know why do I need to create that for our blog application. Again we will going to explain in much simpler way. So first of API stands for Application Programming Interface.
We need to create RESTfull API for our blog because now we wanted to make our blog’s fronted using a fronted framework called Vue.JS and in future maybe a native mobile app or a desktop app.
So to communicate between our Django Backend server and other programming languages, we have to create REST API which will be give us the response in a JSON or XML format instead of html format. So it will be much easier to do crud operation in operation with the JSON data using other programming langues as well.
2.Create first API for showing all the posts we have
To create an API for showing all the posts that we have, means we need to return all the posts as a JSON objects the response. So for that, we have various way to to return the JSON object in Django, and the best way is using Django REST Framework.
But before we use the REST framework we are going to make the first API using Dajngo’s serialize method.
So open the view.py file and create a function based view to handle the first API view.
from django.http import HttpResponse
from django.core import serializers


def all_post_api(request):

	posts = Article.objects.all()
	data = serializers.serialize('json', posts)
	return HttpResponse(data, content_type='application/json')
On the above code first we have imported the serializing object, which will allow us to serialize all the data that we have in our database to JSON objects.
In that case we are not going to use any template so we also need to import HttpResponse function. Then we are storing all the post in posts variable then we are passing the posts variable in the serialize method that we have imported.
In the serialize function, it need two arguments, first is which format you want to translate the model, second is which model you want to serialize. You can learn more about Serializing object on the official documentation ( link ).
Create an url pattern to handle the API view
Now we need a url to call the view, So in the urls.py file create a new path for the first api view that we have just created.
from django.urls import path
from . views import all_post, post_detail, all_post_api
urlpatterns = [
path('', all_post, name="all_post"),
path('post/<int:id>/', post_detail, name="post_detail"),
path('postapi/', all_post_api),
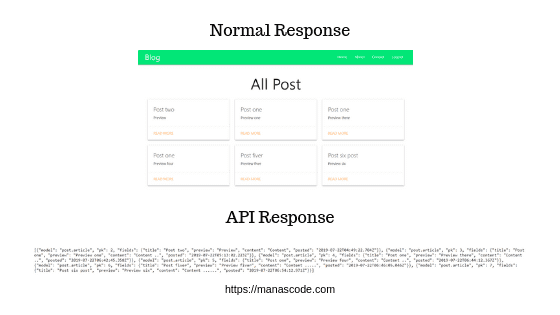
]After successfully write all the code run the server and open the api url and you will see something look like this.

json objects
The above image showing all the posts in a JSON response, to see the JSON objects in a nicer way, you can use the most popular tool called Postman, you can find this tool on chrome web store. On postman the response will look something like this.

JSON response on the POSTMAN
3. Using REST Framework to create API
We can create the translate the model to JSON objects but to create a CRUD API we are going to use Django REST Framework which will allows us to create, read, update and delete any post in our database with API request.
First install the Django REST Framework by using this command.
pip install djangorestframeworkNow we need to install the app in our project, so in settings.py file write this 'rest_framework' in the installed app section.
INSTALLED_APPS = [
    'django.contrib.admin',
    'django.contrib.auth',
    'django.contrib.contenttypes',
    'django.contrib.sessions',
    'django.contrib.messages',
    'django.contrib.staticfiles',
    'post',
    'rest_framework',
]
4. Serializing our Article Model
So, now first we are going to write the same API view for all the posts. For that we need to serialize the model first. According to REST framework if you wants to serialize a model you need to create a file called serializers.py in the app directory.
So create a new file called serializers.py in the app directory and write these lines of codes.
from rest_framework import serializers
from . models import Article


class ArticleSerializers(serializers.ModelSerializer):

	class Meta:
		model = Article
		fields = ['id', 'title', 'preview', 'content']
In the serializers.py , first we are importing serializers and our Article model. Then we are creating the first serializer class to serialize the Article model.
In the ArticleSerializers class, we are defining the model and the fields that we wants to serialize under the class Meta.
Write the API view using REST Framework
So open the view.py first we need to import few things before we write the function.
from django.http import HttpResponse, JsonResponse
from django.views.decorators.csrf import csrf_exempt
from rest_framework.parsers import JSONParser
from .models import Article
from . serializers import ArticleSerializers
Now create a new view, in my case I am creating a view called article_list and write these lines of codes.
@csrf_exempt
def article_list(request):

    if request.method == 'GET':
        article = Article.objects.all()
        serializer = ArticleSerializers(article, many=True)
        return JsonResponse(serializer.data, safe=False)

    elif request.method == 'POST':
        data = JSONParser().parse(request)
        print(request)
        print(data)
        serializer = ArticleSerializers(data=data)
        if serializer.is_valid():
            serializer.save()
            return JsonResponse(serializer.data, status=201)
        return JsonResponse(serializer.errors, status=400)
So on the above code, first we are using a decorator called csrf_exempt, what it does is exempting the csrf token when someone send a post request on the url.
We all know, that in Django if you want to post something to server using a form we have to use the csrf_token tag in our form. For now we are using csrf_exempt but Django REST Framework has more sensible behavior than this, we will be using them in the future posts.
Then in the function we are checking if the request is GET then we are just returning the serialized data in a JSONResponse. and if the request is POST then we garbing the post data in the request object and pursing the data using JSONParser and storing in a data variable.
Then saving the data to database and returning a success response with the serialized data. If there is anything wrong then we returning a error( status 404 ) response.
Write a URL for this view
Now open the urls.py file again and add this new path to urlpatterns list.
path('api/posts/', article_list),Of course while writing the path, import the article_list view. After all that save all the file and reload the server and navigate to the new url. Now this time you will see something look like this.
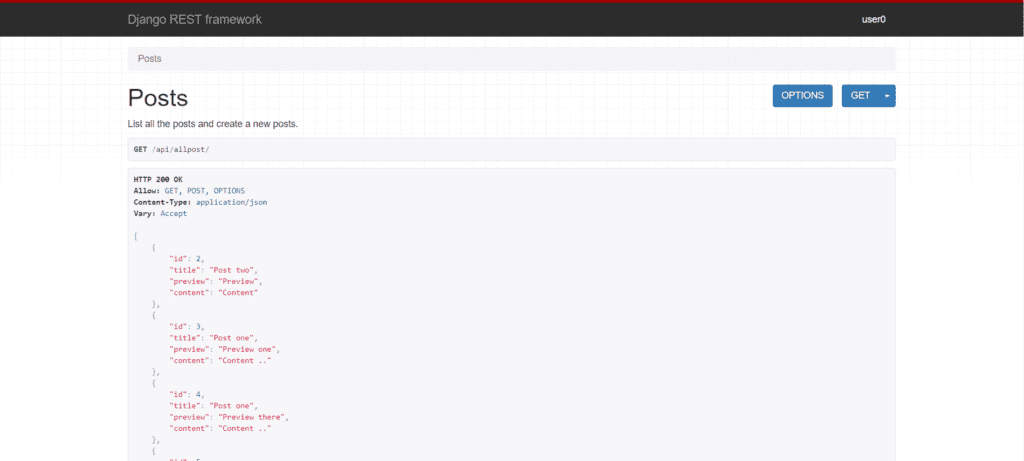
Django REST Framework api view With the new api view you not only get posts, you can create post through the API view.
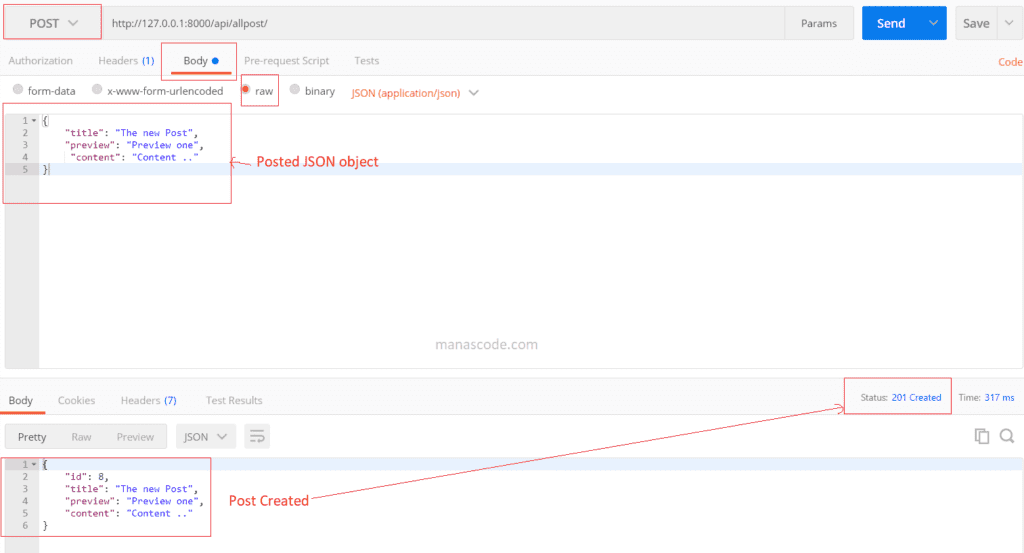
For creating a new post through the api view, we need to open the POSTMAN app and paste the same url on the url bar. Then change the method GETto POST . Now click on the Body tab then click on raw. After that write a JSON object to create a new post.
	    {
            "title": "The new Post",
            "preview": "Preview one",
            "content": "Content ..",
        }
Now click SEND button to send the request to then it will give a success 201 response with the created post. It will look something like this.
Now it’s time to create our Forntend with Vue.JS
So to create our Frontend we are goin to use Vue.JS freamework. For this tutorial we are assuming that you have at least basic knowledge about Vue.JS.
In case if you don’t know how to work with Vue.JS, then don’t worry about that for now. We will cover the Vue.JS basics in another upcoming post. So let’s start write our frontend code.
5. Install Vue.JS in our Project Directory
In the first step of course, we have to install Vue.JS in our Project Directory as we did for the Django. So create a folder outside of our virtual environment directory named frontend. Now cd into the folder and open install Vue.JS using this command in your terminal.
Before installing the Vue.JS in your terminal, make sure you have Node.JS installed in your Computer. If you don’t then follow this link to install Node.JS on your machine.
Click here to download Node.js >> Link
npm install vueAfter installing Vue, we need to have Vue CLI ( Vue command line interface ) to create a vue app. So to install Vue CLI use this command in your command prompt.
npm install -g @vue/cli
# OR
yarn global add @vue/cli
Now, after successfully installing Vue.JS and Vue CLI tool in your computer now we have to create a Vue App in your Project directory. So to create a Vue app write this line to create a Vue App.
6. Create a Vue.JS app
vue create blog If you installing first time then after clicking enter you may go through some question. So for our application we need router, vuex for now, so make sure have these two when installing.
After installing all them successfully you will something look like this in your folder structure.
Folder Structure manascode.com
7.Start coding in our front-end.
Now, open the folder in your Favorite code editor and open the srcfolder then components folder. src>components and create new component called , like the HelloWorld.vue component you are seeing in the components folder. Now paste this lines of code in the new component.
<template>
	<div class="post-card">
		<div class="card">
			<h3>{{ title }} </h3>
			<br>
			<hr>
			<p>{{ preview }}</p>
			<button class="btn btn-primary">Read More</button>
		</div>
	</div>
</template>


<script>


export default {
  name: 'Card',
  props: ['title', "preview"],
}
</script>

<style>

.card{
	width: 500px;
	margin: auto;
	margin-top : 20px;
	padding: 20px;
	background-color: #fff;
	-webkit-box-shadow: 10px 10px 10px 0.5px #C4C0C0;
	box-shadow: 10px 10px 10px 0.5px #C4C0C0;
	transition: 0.50s ease-in-out
}
.card:hover{
    box-shadow: none
}
.btn {
    display: inline-block;
    font-weight: 400;
    color: #212529;
    text-align: center;
    vertical-align: middle;
    -webkit-user-select: none;
    -moz-user-select: none;
    -ms-user-select: none;
    user-select: none;
    background-color: transparent;
    border: 1px solid transparent;
    padding: .375rem .75rem;
    font-size: 1rem;
    line-height: 1.5;
    border-radius: .25rem;
    transition: color .15s ease-in-out,background-color .15s ease-in-out,border-color .15s ease-in-out,box-shadow .15s ease-in-out;
}
.btn-primary {
    color: #fff;
    background-color: #007bff;
    border-color: #007bff;
}
</style>
Now open the Views folder inside the src folder. And open the Home.vue file delete all the code inside and paste this lines of code.
<template>
  <div id="app">
    <div id="nav">
      <router-link to="/">Home</router-link> |
      <router-link to="/create">Create Post</router-link> |
      <router-link to="/about">About</router-link>
    </div>
    <router-view/>
  </div>
</template>


<script>
import Menubar from '../src/components/Menubar.vue'
  export default {
    name: "App",
    components:{
      Menubar,
    }
  }
</script>
<style>
*{
  margin: 0px;
  paddin: 0px;
}
body{
  background-color: #fcfcfc;
  text-align: center;
}
#nav {
    margin: 20px 0;
}
</style>
In the Home.vue file we are fetching all the posts that we have in our backend using axios. Axios will help us to fetch the posts through the API that we have created with a promise.
So now we should have to install the axios in our Vue App project directory. So open the vue app folder in Command prompt and type this command to install axios.
npm i axios --save8.Run the both server to see the Result
After installing the axios, go to the edior save all the file and get back to the console again. Now we need to run the both Django server to serve our api and vue server to show the result on the browser.
So first run the Backend server using python manage.py runsever and for the vue server type this command in your command line tool.
npm run serveWhen both the server successfully run, the vue server will running on localhost:8000. Open the url on you browser to see all the post. But unfortunately you will see something look like this.
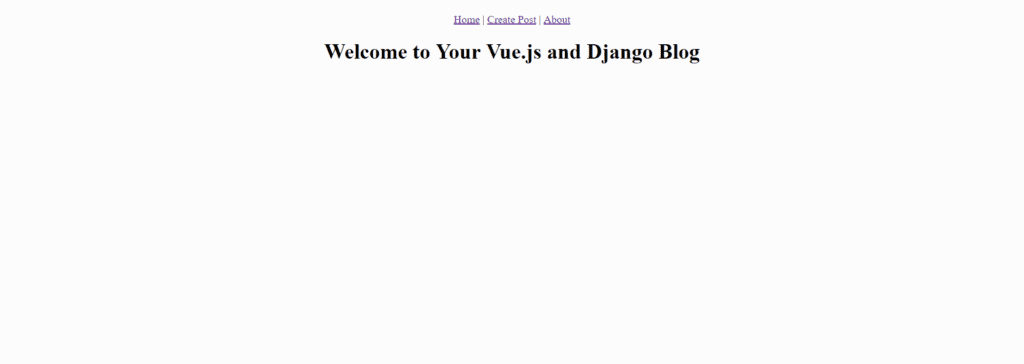 Frontend view in the browser
As we can see we don’t have any post showing in the browser but we have few post that we have created in the back end. So what is going wrong here. To check the error we need open the console of our browser to see any error, as we check commandprompt or bash consle to check the error of our Django code.
So open the browser console by pressing Ctrl+shift+I ( Chrome windows user ) and you will see this error in the console.

9.Fixing the CROSS HEADER issue
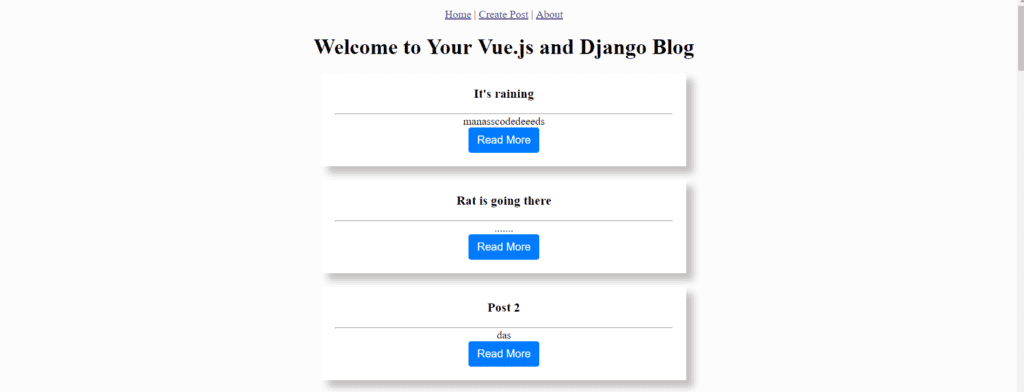
The error means we have the Cross Header issue. So to fix that we need to get back to our back end code. Open the backend folder and fisrt we need to install a Django thirdparty app called Django Cross Header. So again pip install django-cors-headers and install the app.
After install the app now we should install the app in our Django app by including the name of the app in setting.py file.
# Application definition

INSTALLED_APPS = [
    'django.contrib.admin',
    'django.contrib.auth',
    'django.contrib.contenttypes',
    'django.contrib.sessions',
    'django.contrib.messages',
    'django.contrib.staticfiles',

    # Third Party App
    'corsheaders',
    'post',
    'rest_framework',
]
After that, now anywhere in the settings.py file add these two lines of codes.
CORS_ORIGIN_ALLOW_ALL = True
CORS_ALLOW_CREDENTIALS = True
Now save all the file make sure that both server is running. Go to browser again and reload the front end server localhost:8000. Now you will see your back end posts are coming through in front end server.
10.Now we need to create a view for ‘create a new post’ from the front-end
So again open theviews folder under src directory in the Front end folder. Now create a new vue file called Createpost.vue, and paste this lines of code in the Createpost.vue file.
<template>
  <div class="createpost">
    <h1>Create a new Post</h1>
    <input type="text" placeholder="Post Title" v-model='post.title'><br>
    <input type="text" placeholder="Post Preview Text" v-model='post.preview'><br>
    <textarea placeholder="Post Details" v-model='post.content'></textarea><br>
    <div class="btn btn-primary"v-on:click="submit">Create Post</div>
  </div>
</template>

<script>
// @ is an alias to /src
import Postcard from '@/components/Postcard.vue'

import axios from 'axios'

export default {
  name: 'home',
  data(){
    return{
      post: {
        title : "",
        preview: '',
        content: "",
      }
    }
  },
  methods:{
    submit(){
       axios.post('http://127.0.0.1:8000/api/posts/', this.post )
      .then(response => {
        this.$router.push("/")
      })
      .catch(erro => {
        alert(erro)
      })
    }
  }
}
</script>

<style>
	.createpost{
		width: 760px;
		margin: auto
	}
  input{
    width: 100%;
    margin-bottom: 20px;
    padding: 10px 0;
  }
  textarea{
    width: 100%;
    height: 200px;
    margin-bottom: 20px;
  }
</style>
In the Createpost.vue file we are garbing all the from data and submitting the form using axios.post() method.
Now we need to map the url in or router.js file same as we did for Django urls. So open the router.js file in the src directory and add a new route in the routes array.
import Vue from 'vue'
import Router from 'vue-router'
import Home from './views/Home.vue'
import Createpost from './views/Createpost.vue'

Vue.use(Router)

export default new Router({
  mode: 'history',
  base: process.env.BASE_URL,
  routes: [
    {
      path: '/',
      name: 'home',
      component: Home
    },
    {
      path: '/create',
      name: 'createpost',
      component: Createpost
    },
    {
      path: '/about',
      name: 'about',
      // route level code-splitting
      // this generates a separate chunk (about.[hash].js) for this route
      // which is lazy-loaded when the route is visited.
      component: () => import(/* webpackChunkName: "about" */ './views/About.vue')
    }
  ]
})
Now save all the file and go back to the browser and click the Create Post in the menu. You will see a new page with form for create a new post to our back end. So fill the form and click submit and you will be redirected to the home page with new post list.
Don’t worry about the Vue.JS code now if you are new. We will cover Vue.JS basics in the upcoming posts in details. So follow along to learn Vue.JS from scratch.
Now we need the Post details, Post Edit, Post Delete API. But we will cover these three API view in the next Post because we don’t want to make the post lengthy.
If anything I missed in this post please let me know in the comment section. Thank you for reading.